How to boost a post on a Facebook page
How to boost a post on a Facebook page
"Boosting a
Facebook post" takes an existing organic post and injects it with a shot
of paid advertising fuel. It's like giving your message a rocket pack,
propelling it into the feeds of a wider audience, beyond just your followers.
Think of it as choosing a star performer from your page and putting them on the
main stage with a spotlight. You define the goal - more website clicks, brand
awareness, or simply sparking conversations - and Facebook tailors the audience
to best achieve it. It's a targeted way to amplify your voice, reach new
communities, and give your content the power to ignite engagement. So, when
your post deserves to shine brighter, give it a boost, and watch it take flight
across the Facebook cosmos.
Step 01
Log in to your
Facebook account.
Step 02
Click the profile
picture in the top right corner.
Step 03
Click on the profile
that you want to boost. If you can't see the account in there, click “See all profiles” to see all the
accounts. From there, click on the profile to select the account.
Step 04
There are two ways
to get into the boosting process.
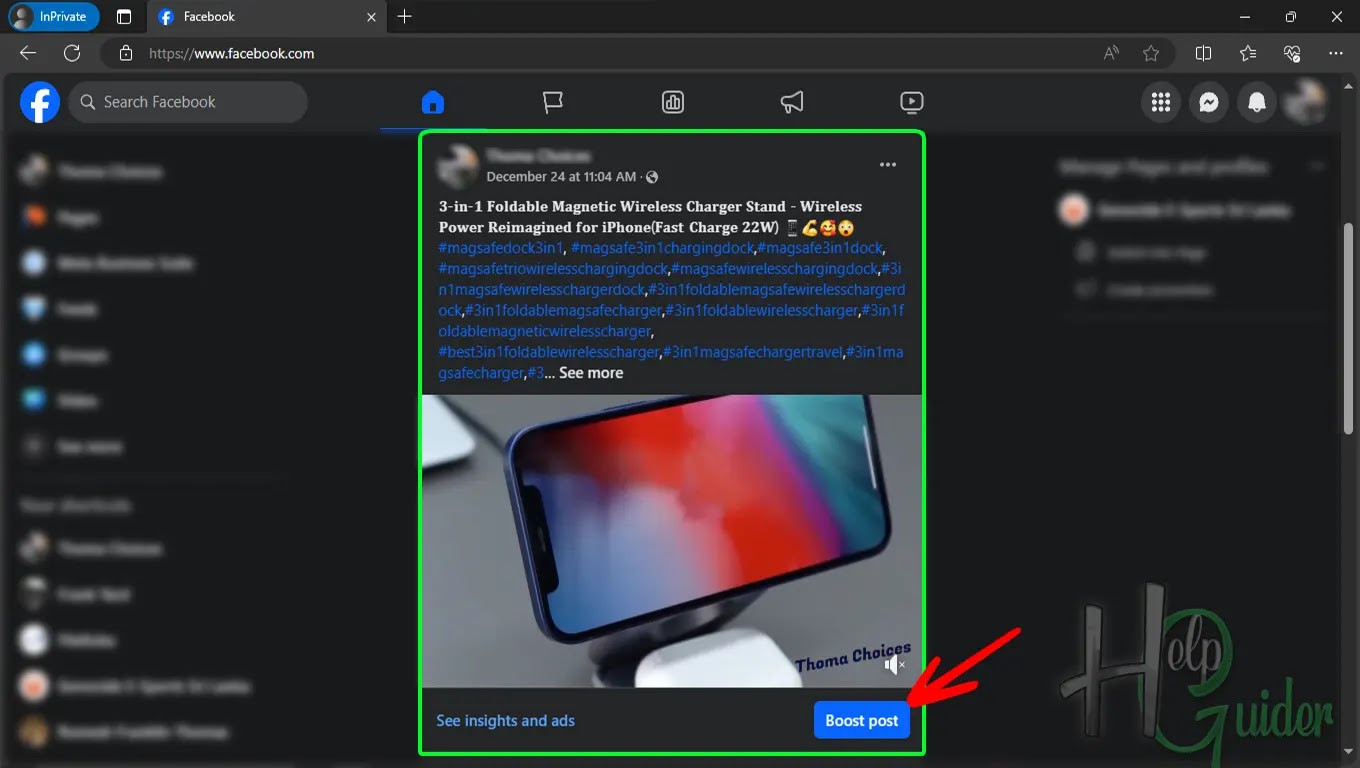
One,
Find the post you
want to boost on the wall. On the post's bottom right corner, you can see the
button “Boost Post." Click it.
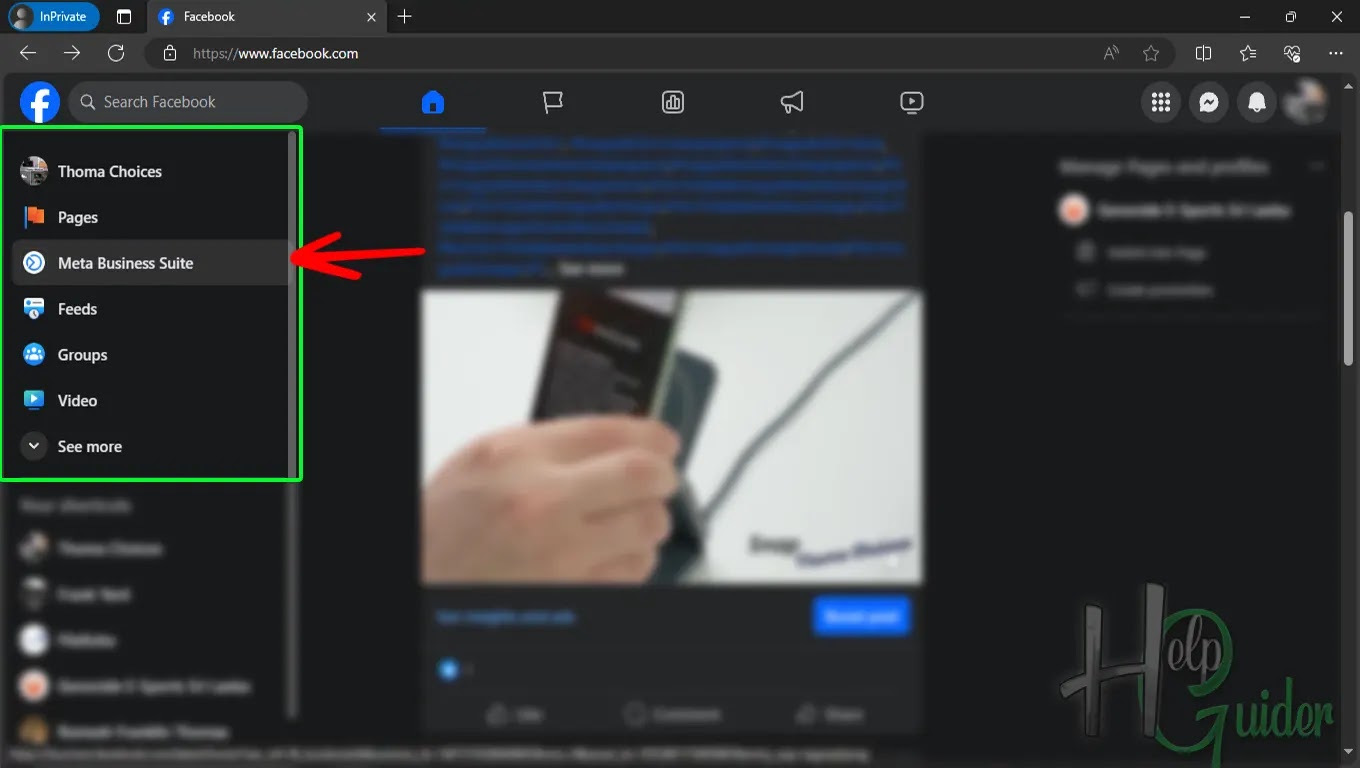
Two,
On the left-top
corner, under the account name, find “Meta
Business Suite,” then click it.
It will take you to
the “Meta Business Suite” dashboard. From there, you can manage everything on that page. On the left side
panel, click “Content.”
Under the published
tab, you can see all the posts you have published so far. Find the post you
want to boost and click "Boost.”
Step 05
From here, start the
boosting process.
Goal
On the goal panel,
click "Change,” then select
your goal for this ad. If you can't see your goal on the list, click “Automatic” and click "Save.”
Step 06
Advantage+ creative
This option asks
your permission to add creative + advantage to the post; it can't control us
because it automatically delivers different ad creative variations to people.
If you like to add "Advantage+
Creative” to the ad, you can turn it on, or if you want to do as you want,
turn it off.
Step 07
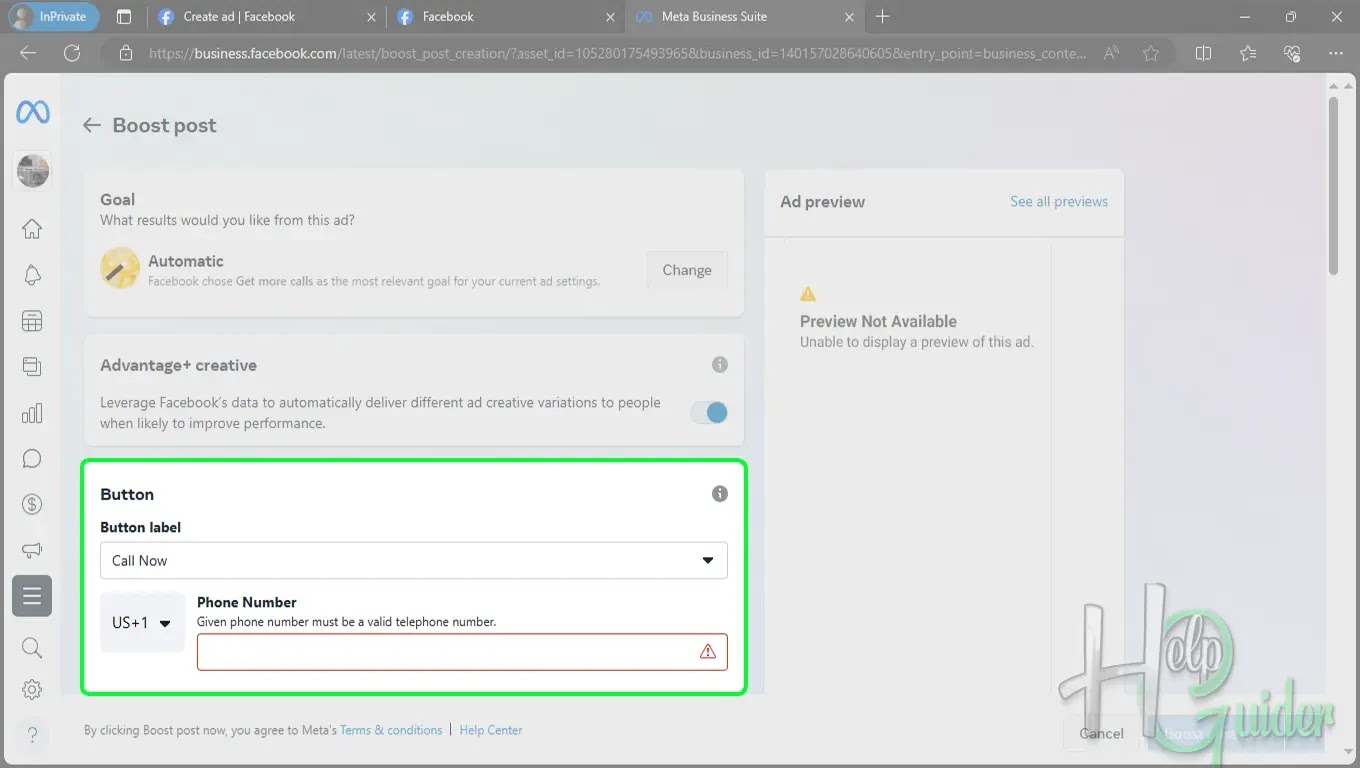
Button
You can add a button
to your ad as you like. The button will help the customers contact you or visit
the site if they like your ad and are looking for more information or
something.
As you can see, you
must enter some information as part of your selection, such as your website,
mobile number, and sign-up page.
If you do not need
any buttons for the post, you can click the “No button.”
Step 08
Special Ad Category
There are four
special categories on Facebook.
Turn on "Is
this ad about employment?” and see whether your ad falls under those
categories or not.
If your ad falls
under one of these categories, you must check it or your ad will be banned. In
some categories, you need authorization to publish the post. You need to get
approval for that.
If your ad does not
fall under one of these categories, Turn off the “Is this ad about employment?”
If you select one of
these four categories, you have to add the country where the ad you want to
run. Click the "Edit"
button, add the counties you want, and save.
Step 09
Audience
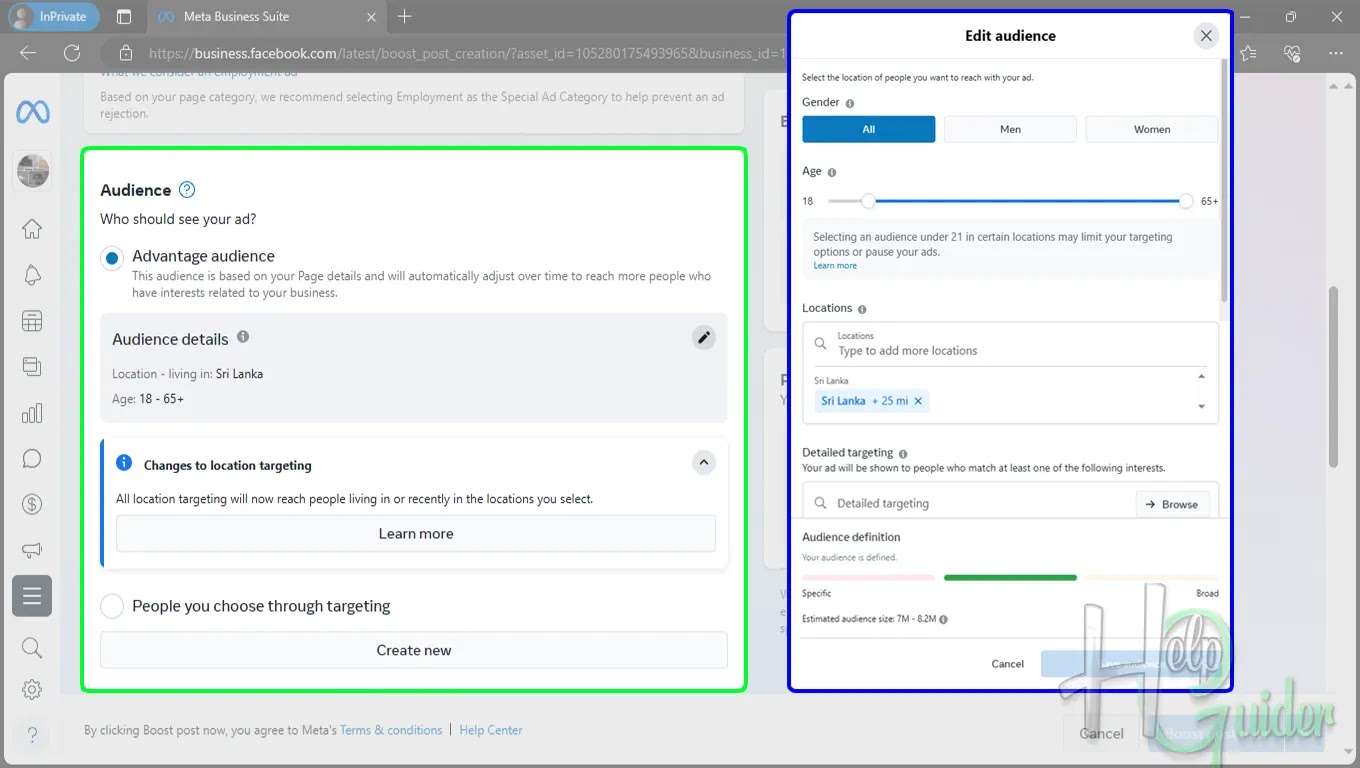
You can manage the
audience that would like to see your ad. There are two options for targeting
the audience.
Advantage audience
This audience is
based on the Facebook page details. It will automatically adjust over time to
reach more people who have interests related to your business. You can also
edit the audience details.
Gender – You can
select the gender or select all for both genders.
Age – The age range
of the audience. (Some advertisements are not suitable for people under the age
of 21 in some countries.)
Locations – Enter
the location where your ad should be advertised.
Detailed targeting –
Here, you have to select one or a few categories of people who would like to
see your ad. The category of your ad.
People you choose
through targeting
Here you choose the
audience, not Facebook, so you have to add audience details. Adding audience
details is the same as before.
Create new
Last but not least,
you can create your own targeting audience details and save them for the next
time. Click “Create New” to create
your own targeting audience. And add targeting audience details like last time.
Step 10
Schedule and duration
You can set your
ad's running time, starting date, and ending date. Also, you can set “Total Budget” for this ad.
First, set the
duration of the ad, the start date and time, and the end date, then select your
total budget.
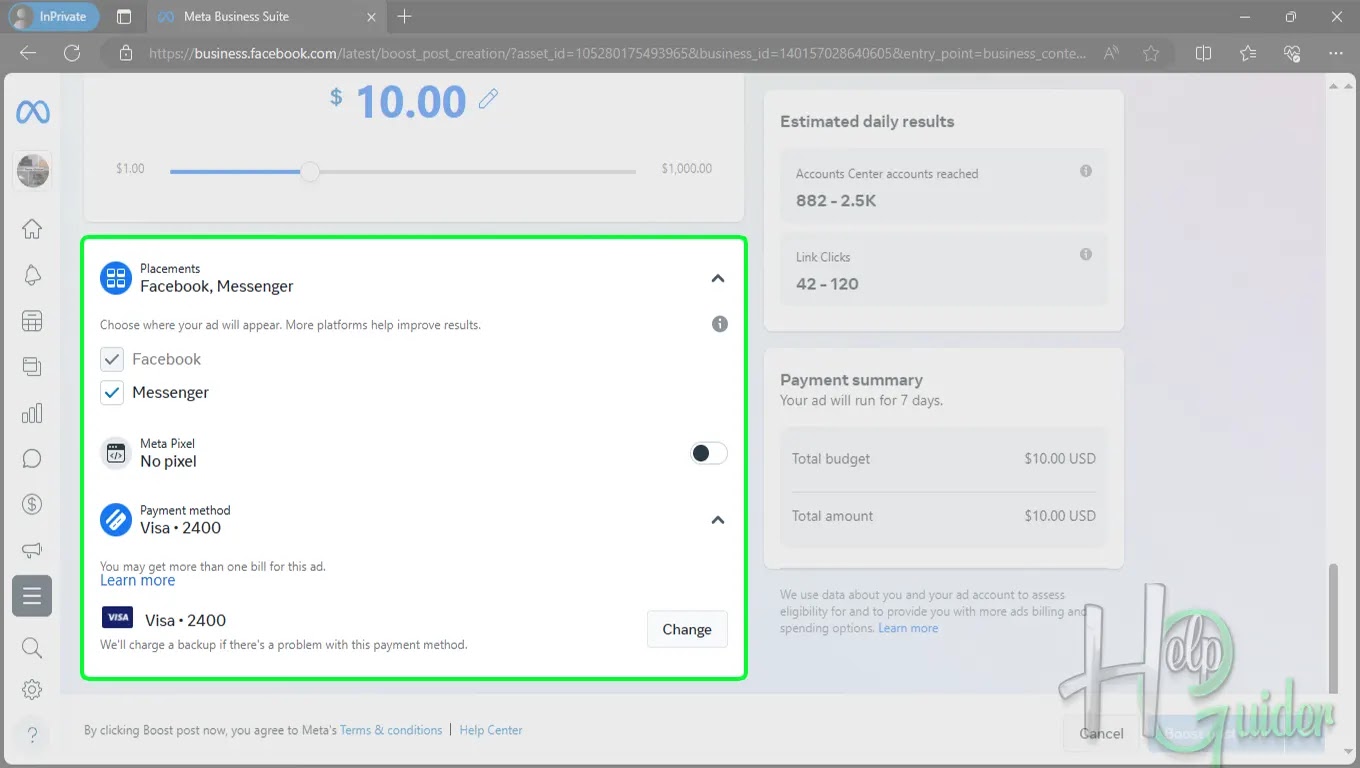
Estimated daily
results and payment summary will show you on the right side.
Step 11
Final Part
In the final part,
you need to add payment details and where you want to run the ad.
Placements - First,
you have to select whether the ad should run on Facebook, Messenger, or
WhatsApp. Facebook has already locked you, so add or remove Messenger or
WhatsApp.
Meta Pixel - Create
a meta-pixel to measure results from your ads and understand the actions people
take on your website.
Payment method – You
can add or change the payment method.
After you have done
every modification and change, recheck them again for confirmation, then click
“Schedule” or “Boost Post Now” to start the bosting.
I hope you learn something here. If you have
anything to ask, please do not hesitate to ask.

